How the Best Kitchens Are Built Around How You Actually Cook
Your kitchen should serve you, not the other way around. Yet many homeowners approach kitchen renovations by focusing on aesthetics — beautiful cabinets, trendy countertops, statement lighting — without truly thinking about whether the space will function for how they actually cook and live.
The result? A gorgeous kitchen that’s frustrating to use.
Dishes get washed three feet from the stove. The trash is tucked behind a corner you have to navigate around. Prep space is minimal. Appliances are positioned illogically. You spend half your cooking time walking back and forth, reaching across obstacles, and wishing things were positioned differently.
At All-Pro Renovations, we believe your kitchen’s functionality should come first, aesthetics second. When a kitchen is designed around how you actually cook, everything else falls into place. The beauty naturally follows.
In this comprehensive guide, we’ll walk you through the principles of kitchen workflow, layout, and functionality — so your Kansas City kitchen renovation creates a space that works as beautifully as it looks.
🎯 Understanding the Kitchen Work Triangle
The kitchen work triangle is one of the most important concepts in kitchen design. It’s not complicated, but it’s powerful.
The three points of the work triangle are:
- Sink – Where you wash, rinse, and prep
- Stove – Where you cook
- Refrigerator – Where you store and retrieve ingredients
Why It Matters:
These three zones account for approximately 80% of kitchen work during cooking. The efficiency of moving between these three points directly determines how enjoyable cooking will be.
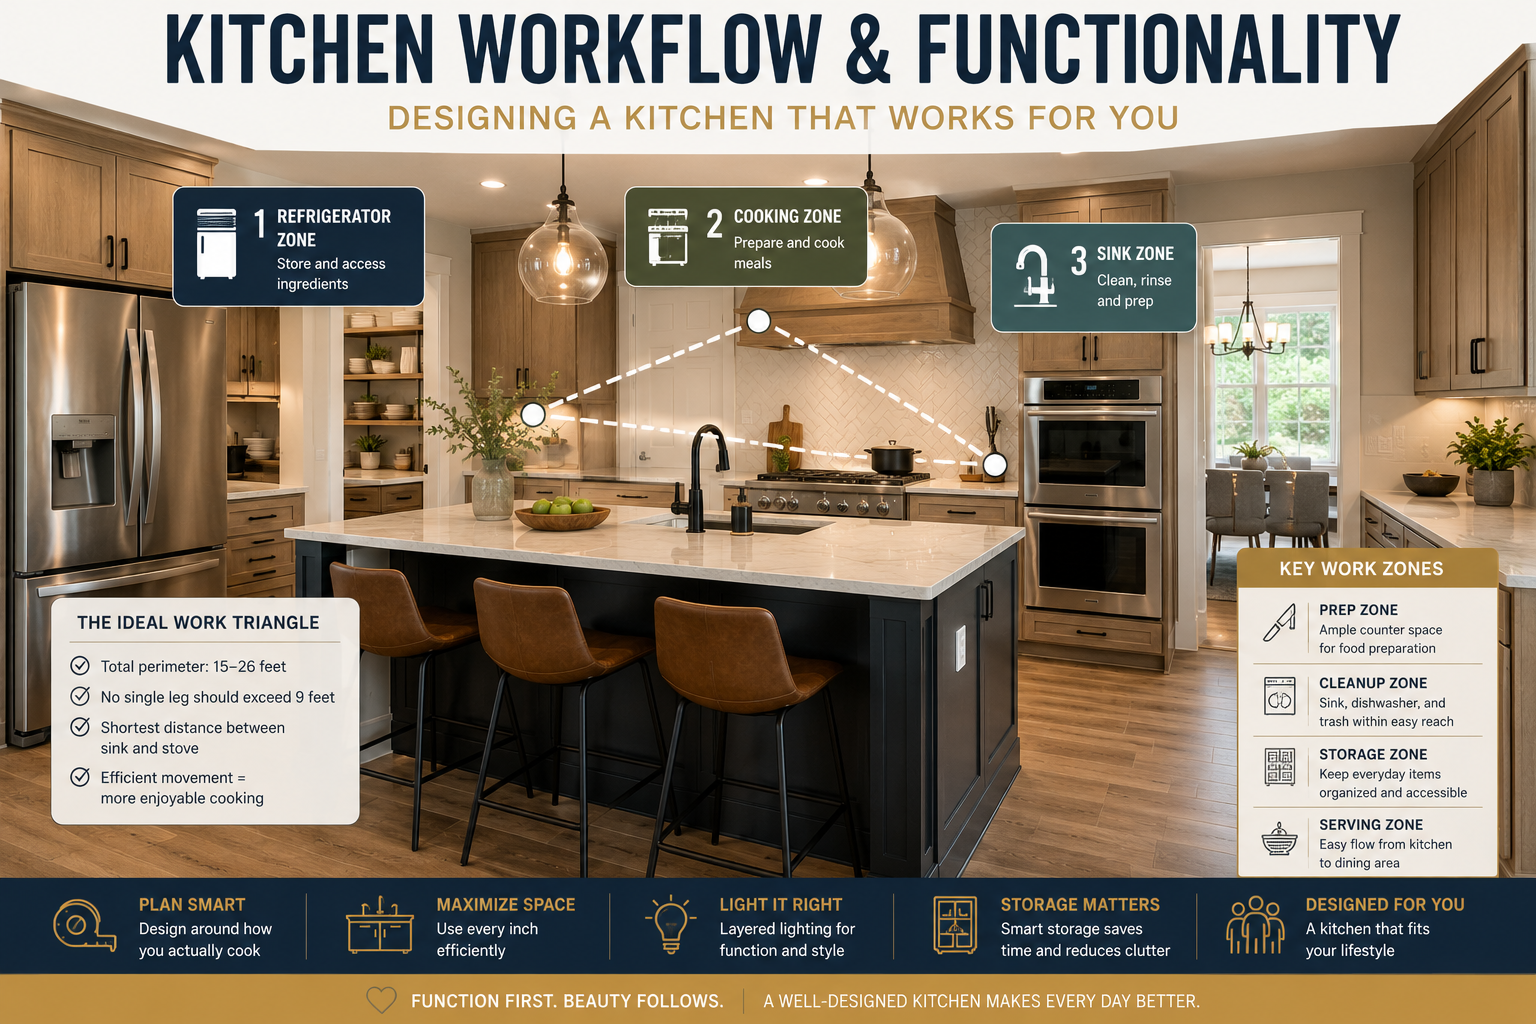
The Ideal Work Triangle:
Total perimeter: 15-26 feet (the combined distance between all three points)
No single leg: Should be less than 9 feet
Shortest leg: The distance between sink and stove (you’ll make this trip most frequently)
Why these distances work:
Shorter than 15 feet feels cramped. The zones feel cramped and inefficient. Longer than 26 feet means excessive walking. You spend more time traveling than cooking.
The Work Triangle in Different Layouts:
Galley Kitchen (Single-line): Place sink and stove on one wall, refrigerator on the other. This creates a compact triangle perfect for efficient cooking in smaller spaces.
L-Shaped Kitchen: Ideal work triangle positioning: Stove on one wall, sink on the adjacent wall, refrigerator on the first wall. This creates a natural, efficient triangle.
U-Shaped Kitchen: Multiple triangle options. Typically: Refrigerator at one end, sink in the center, stove at the other end. Creates excellent workflow for multiple cooks.
Island Kitchen: Island typically houses either the sink or cooktop, creating the triangle between island and the wall-mounted appliances. This is excellent for entertaining while cooking.
🔄 Kitchen Workflow Zones: Creating Logical Movement
Beyond the basic work triangle, successful kitchens divide the space into distinct work zones.
Zone 1: Refrigerator/Ingredient Zone
Location: This is typically one anchor point of your kitchen.
Components:
- Refrigerator/freezer
- Pantry storage
- Counter space adjacent to refrigerator for unloading groceries
- Prep counter for ingredient staging
Why it works: Everything you need to gather ingredients is in one zone. You unload groceries, access pantry items, and stage ingredients without creating traffic congestion elsewhere.
Counter space: Minimum 24 inches adjacent to refrigerator for unloading and staging.
Zone 2: Prep/Sink Zone
Location: Usually central to the kitchen, with good access to other zones.
Components:
- Sink (double or single basin)
- Garbage disposal
- Compost or waste container
- Counter space on both sides of sink
- Dishwasher (ideally adjacent to sink)
- Paper towel holder
- Small appliances (if used frequently)
Why it works: This is where washing, rinsing, and initial prep happens. Keeping it central and well-supplied makes food prep efficient.
Counter space: Minimum 36 inches on one side of the sink, ideally 36 inches on both sides.
Important: Don’t place the prep zone directly between the refrigerator and stove. You’ll create a traffic jam when multiple people are cooking.
Zone 3: Cooking/Heat Zone
Location: Ideally positioned so you can see into the kitchen and dining areas while cooking.
Components:
- Stovetop or cooktop
- Wall oven (or both cooktop and wall oven)
- Counter space to the side of stove for staging and resting
- Ventilation/range hood
- Storage for cooking tools
- Easy access to cooking ingredients
Why it works: Everything needed for actual cooking is accessible without leaving the cooking station. You’re not hunting for a spatula or spice while food burns.
Counter space: Minimum 24 inches on each side of the cooktop (ideally 36 inches).
Ventilation: Critical. Poor ventilation makes cooking unpleasant and creates grease buildup. Your range hood should remove cooking odors and steam effectively.
Zone 4: Serving/Storage Zone
Location: Between cooking area and dining room (if they’re connected).
Components:
- Serving counter space
- Dish storage
- Glass storage
- Easy access to dining area
- Clear pathways for moving food to table
Why it works: Creates a natural transition between cooking and eating. Dishes and serving pieces are accessible without retrieving them from the cooking zone.
Zone 5: Cleanup Zone
Location: Sink area, with easy access to dishwasher, trash, and compost.
Components:
- Sink (primary cleanup location)
- Dishwasher
- Trash and compost containers
- Dish storage
- Towel racks and drying areas
Why it works: Cleanup is the second major kitchen activity (after cooking). Having all cleanup elements in one zone reduces the time spent on this task.
📐 Counter Space: Quantity and Placement Matter
One of the biggest complaints about poorly designed kitchens? “Not enough counter space.”
How Much Counter Space Do You Need?
Minimum: 13 linear feet of counter space total
Ideal: 16-20 linear feet of counter space
What matters: Not just total amount, but distribution and accessibility.
Counter Distribution:
Adjacent to appliances: Never place a high counter right at an appliance. You need work surface alongside your stove, sink, and refrigerator.
Prep zone: Your longest counter space should be in the prep area. Plan for 36-48 inches for actual food preparation.
Island counter: If your kitchen includes an island, this provides additional counter space and creates a natural gathering spot.
Floating shelves vs. closed storage: Open shelving provides visual access to daily-use items; closed storage keeps clutter hidden. Balance both for functionality and aesthetics.
Counter Depth and Height:
Standard depth: 24 inches (allows access to items stored against the wall behind)
Standard height: 36 inches (ergonomic for most people; ADA accessible height is 34 inches)
Island height variation: Many islands include both standard-height work surface and raised bar seating (36-42 inches).
Counter Material Considerations for Functionality:
Different materials affect how your kitchen functions:
- Granite/quartz: Durable, heat-resistant, stain-resistant. Excellent for busy kitchens.
- Butcher block: Warm aesthetic, requires maintenance, softer surface. Good for aesthetics, slightly less practical for heavy-use cooking.
- Laminate: Budget-friendly, least heat-resistant. Fine for light cooking or kitchen-adjacent spaces.
- Concrete: Modern look, sealed for durability, heat-resistant. Works well in contemporary kitchens.
Reality: Choose based on your cooking habits. If you cook daily with high heat, durability matters more than aesthetics. If you cook rarely, aesthetic appeal can take priority.
🏠 Appliance Placement: Beyond the Work Triangle
While the work triangle covers refrigerator, stove, and sink, modern kitchens have additional appliances. Where they go matters.
Cooktop vs. Wall Oven:
Traditional arrangement: Cooktop in kitchen island or on wall; wall oven adjacent to cooktop
Advantages: Cooking and baking elements close together; good for multi-component meals
Alternative arrangement: Wall oven separate from cooktop
Advantages: Two people can cook simultaneously; oven heat doesn’t impact cooktop area
Consider: How many people cook simultaneously? Do you bake frequently? Your answers determine ideal placement.
Dishwasher Placement:
Ideal location: Adjacent to sink (either side) with door that opens toward the kitchen (not toward traffic paths)
Why it works: You rinse at sink, load into dishwasher without moving. One fluid motion.
Door clearance: Ensure the dishwasher door doesn’t swing into walkways or into someone working at the sink.
Accessibility: If you have mobility concerns, consider a drawer-style dishwasher that doesn’t require bending.
Microwave and Small Appliances:
Storage location: Many kitchens dedicate a drawer or cabinet for small appliances, pulling them out when needed.
Counter location: If you use certain appliances daily (coffee maker, toaster), keep them accessible on counter rather than storing them.
Above-stove microwave: Common in apartment kitchens but often inefficient. Heat rises from stove, and items above the stove are harder to reach safely.
Better placement: Counter adjacent to prep zone, or in a dedicated appliance garage (cabinet with doors that close).
💡 Lighting for Cooking Function
Beautiful kitchen lighting is important. But lighting that allows you to actually see what you’re cooking is essential.
Three Layers of Kitchen Lighting:
Task Lighting (Most Important for Cooking)
- Over stovetop: Range hood with integrated lighting
- Over sink: Pendant lights or recessed lights positioned to eliminate shadows
- Over prep zone: Under-cabinet lighting or pendant lights
Goal: Eliminate shadows while you work. Shadow-free cooking and prep spaces are safer and more efficient.
Recessed lights specifically: Position so they light the counter surface, not the person’s face (which creates shadows on the counter).
Ambient Lighting (Overall Kitchen Illumination)
- Ceiling lights: Main light source for general visibility
- Position: Central to the kitchen; multiple fixtures if kitchen is large
- Dimmers: Allows adjustment based on time of day and activity
Accent Lighting (Design Element)
- Decorative fixtures: Pendant lights over island, fixtures that add visual interest
- Purpose: Makes the kitchen feel intentional and polished
Lighting Color Temperature for Cooking:
Daylight (4000-5000K): Best for cooking and food prep. Colors appear true, making it easier to judge doneness and color.
Warm (2700K): Better for ambiance and evening use, but less ideal for actual cooking.
Recommendation: Use daylight temperature for task lighting (over stove and prep areas); warm temperature for ambient/accent lighting.
🗂️ Storage: Organization Directly Affects Workflow
An efficiently organized kitchen reduces time spent searching for items and reduces frustration.
Vertical Storage (Maximizing Cabinet Height):
- Upper cabinets: Store glasses, dishes, everyday serving pieces
- Shelves at eye level: Frequently-used items (spices, cooking ingredients, appliances)
- Higher shelves: Occasional-use items (seasonal dishes, specialty equipment)
- Lower cabinets: Heavy items, pots, pans, mixing bowls
Principle: Frequently-used items at eye level and within arm’s reach. Less-used items higher or lower.
Accessible Organization:
Pull-out shelves: Make deep cabinets accessible. Items at the back aren’t forgotten.
Drawer dividers: Keep utensils, tools, and small items organized and findable.
Spice organization: Consider drawer-based spice storage or wall-mounted spice racks positioned at arm’s reach during cooking.
Pot and pan storage: Open shelving or pull-out racks near cooktop make cooking more efficient.
Pantry Organization:
Walk-in pantry: If space allows, provides excellent storage and organization.
Pantry closet: Smaller than walk-in but still functional; position near prep zone.
Open shelving: Trendy for aesthetic appeal but requires more organization discipline.
Clear containers: Make contents visible and shelf-life more obvious.
🚶 Traffic Patterns and Movement Through the Kitchen
A well-designed kitchen accommodates movement without collisions or obstacles.
Main Pathways:
Identify the natural traffic flow in your kitchen:
- Refrigerator to prep zone: People moving ingredients for cooking
- Prep zone to cooking: Moving prepared ingredients to stove
- Cooking to serving: Moving finished food to table/serving area
- Entry to kitchen: People entering from dining area, mudroom, or garage
Design principle: These pathways should be at least 36-42 inches wide without obstacles. Narrower feels cramped and creates conflicts when multiple people move through simultaneously.
Multi-Cook Scenarios:
If multiple people cook simultaneously, consider:
- Two sink area: Some kitchens include two small sinks instead of one large one (one person preps, another cleans)
- Island prep space: Additional counter space for second cook to work at island while primary cook uses main counter
- Multiple cooktops: Separate areas for cooking (stovetop and wall oven, or induction cooktop and traditional stove)
- Separate zones: Design kitchen so two people can work without getting in each other’s way
🎨 Bringing It All Together: Kitchen Design Principles
Principle 1: Functionality First
Beauty follows function. Design the kitchen workflow first; choose beautiful materials and finishes second.
Principle 2: Personal Cooking Style
Every kitchen should reflect how the user actually cooks:
- Frequent entertainer: Islands, open prep space, serving areas take priority
- Baker: Ample counter space, organized spice and ingredient storage, proper ventilation for heat
- Minimal cook: Compact, efficient design; less focus on elaborate zones
- Healthy cooking focus: Prep-focused design with ample counter for vegetable prep and healthy ingredient storage
Principle 3: Single Cook vs. Multi-Cook
Design for how many people typically cook simultaneously:
- Single cook: Compact work triangle with efficient zones
- Multiple cooks: Separated zones, multiple counters, clear pathways to prevent collisions
Principle 4: Daily Habits and Lifestyle
Consider your actual kitchen habits:
- Breakfast and coffee: Keep coffee maker and breakfast items easily accessible
- Meal prep: Ample counter and storage for meal-prep routines
- Entertaining: Open layout, island, serving spaces, bar seating
- Kids helping: Counter heights and accessible storage for children to participate
📐 Kitchen Layout Styles and Their Workflow Advantages
Galley Kitchen (Two Parallel Walls)
Workflow: Linear, efficient path between appliances
Best for: Single cook, small spaces, apartment kitchens
Work triangle: Compact and efficient
Challenge: Two people can’t comfortably cook simultaneously
L-Shaped Kitchen
Workflow: Natural work triangle with clean zones
Best for: Medium-sized kitchens, single or dual cooks
Work triangle: Excellent
Advantage: Creates natural separation between cooking and prep zones
U-Shaped Kitchen
Workflow: Multiple work zones, excellent storage
Best for: Larger kitchens, frequent entertainers, multi-cook households
Work triangle: Multiple options; can accommodate multiple cooks
Advantage: Lots of counter space and storage; multiple work stations
Island Kitchen
Workflow: Central island becomes secondary work station; enables multi-cook scenarios
Best for: Open-concept homes, entertaining, multi-cook households
Work triangle: From island to wall-mounted appliances
Advantage: Island provides additional counter, storage, and seating; creates gathering space
Peninsula Kitchen
Workflow: Similar to island but attached to one wall; more compact
Best for: Medium kitchens with some open-concept needs
Work triangle: From peninsula to wall-mounted appliances
Advantage: Provides some island benefits in smaller space; easier plumbing than island
🔍 Common Kitchen Workflow Mistakes to Avoid
Mistake 1: Placing Prep Zone Between Refrigerator and Stove
Creates a traffic bottleneck. Everyone cooking has to cross the prep zone.
Fix: Position prep zone adjacent to refrigerator; keep pathway to stove clear.
Mistake 2: Insufficient Counter Space Around Appliances
Cooking becomes awkward when you don’t have space to stage ingredients or rest pans.
Fix: Ensure minimum 24 inches on each side of stove and sink.
Mistake 3: Poor Ventilation Above Cooking Area
Cooking heat and steam spread throughout house; kitchen smells linger; grease accumulates.
Fix: Install properly-sized range hood with ducting to exterior (not just recirculating).
Mistake 4: Appliances Positioned Without Considering Use Frequency
Frequently-used appliances placed far from main work areas; less-used appliances take premium counter space.
Fix: Map your actual cooking routine; position appliances accordingly.
Mistake 5: Insufficient Storage in Cooking Zone
Cooking tools, spices, and frequently-used ingredients stored far from where they’re needed.
Fix: Dedicate cabinet space near stove for cooking tools, spices, oils, and condiments.
Mistake 6: Single Overhead Light
Shadow-filled counters make cooking difficult and less safe.
Fix: Layer lighting with task lighting over work areas and ambient lighting overall.
🎯 Designing Your Perfect Kitchen Workflow: A Step-by-Step Process
Step 1: Document Your Current Cooking Patterns
For one week, pay attention to:
- Where do you spend most time while cooking?
- What frustrates you about current kitchen layout?
- How often do multiple people cook simultaneously?
- Which appliances do you use daily?
- How do you move through the space?
This self-observation provides the foundation for better design.
Step 2: Map the Work Triangle
Measure distances between:
- Refrigerator to sink
- Sink to stove
- Stove to refrigerator
Total should be 15-26 feet. If significantly different, workflow challenges likely exist.
Step 3: Identify Work Zones
Based on your cooking style, design distinct zones:
- Ingredient/refrigerator zone
- Prep/sink zone
- Cooking zone
- Serving/storage zones
Step 4: Plan Counter Space
Identify where you need the most counter:
- Food prep? Main counter at prep zone
- Entertaining? Serve counter in open area
- Baking? Counter space for working with dough
Step 5: Plan Appliance Placement
Position appliances based on frequency of use and workflow:
- Daily-use appliances in main work zone
- Occasional-use appliances in secondary locations
- Large appliances positioned for efficient traffic flow
Step 6: Design Storage
Organize storage around use:
- Frequently-used items at eye level, arm’s reach
- Less-used items higher or lower
- Cooking tools near stove
- Dishes and glasses near sink
Step 7: Layer Lighting
Plan task lighting over work areas, ambient lighting for general visibility, accent lighting for design.
Step 8: Verify with a Professional
A designer or experienced contractor can validate your plan, identify potential issues, and suggest refinements.
The Bottom Line: Function Creates Beauty
The most beautiful kitchens are beautiful precisely because they function perfectly. When a kitchen is designed around how you actually cook, every element serves a purpose. The workflow feels natural. Cooking is enjoyable. Cleanup is efficient.
Aesthetics — the cabinet style, countertop color, lighting fixture design — enhance this functional foundation. But function comes first.
At All-Pro Renovations, we design kitchens around how you live. We ask questions about your cooking habits, your family’s lifestyle, and your vision for the space. We translate those answers into a kitchen that’s not just beautiful, but genuinely works for you.
Ready to Design Your Perfect Kitchen?
If you’re planning a kitchen renovation in the Kansas City area, let’s start with workflow and functionality.
Contact All-Pro Renovations today for your free design consultation.
📞 Call us at 913-354-2380
📅 Schedule your free estimate online
💬 Email us at info@all-proserviceskc.com
We serve homeowners across Kansas City, Overland Park, Olathe, Lee’s Summit, Shawnee, Lenexa, and all surrounding communities.
FAQs About Kitchen Workflow and Functionality
Q: What’s the ideal distance between the three points of the work triangle? A: Total perimeter should be 15-26 feet. Each individual leg should be less than 9 feet. If your triangle is significantly different, workflow challenges likely exist.
Q: How much counter space do I actually need? A: Minimum 13 linear feet; ideal is 16-20 linear feet. More important than total amount is how it’s distributed. You need work surface adjacent to appliances and ample prep space.
Q: Can I fit a dishwasher if my kitchen is small? A: Yes, but placement matters. Position it adjacent to the sink for efficient workflow. Drawer-style dishwashers take less space than traditional models.
Q: What if multiple people cook simultaneously? A: Design separate work zones. Island kitchens work best for multi-cook households. Consider two sink areas or multiple prep surfaces so cooks don’t get in each other’s way.
Q: Should I put the oven next to the cooktop? A: Not necessarily. Some cooks prefer them separate so heat from the stove doesn’t impact the oven area. Others like them together for convenient multi-component meal preparation. Consider your actual cooking style.
Q: How important is lighting in kitchen design? A: Very important. Poor lighting makes cooking more difficult and less safe. Layer lighting with task lights over work areas, ambient lighting overall, and accent lighting for design.
Q: What if my kitchen is very small? A: Prioritize the work triangle and efficient workflow. Use vertical storage, compact appliances, and open shelving to maximize function in minimal space.
All-Pro Renovations has been designing functional, beautiful Kansas City kitchens since 2017. We believe every kitchen should work as well as it looks. Contact us today to start designing your perfect kitchen.
Posted in Construction, Design, Exteriors, Kitchen & Bath, Property Investment, Remodeling